About Initrd
An initrd file, often zipped as initrd.gz is a file containing an "Initial Ram Disk" that Linux loads when it boots. The initrd can contain a very small set of programs needed to just work the computer, like checking files or formatting drives, or it can contain much more functionality, such as display managers and window managers and even GUI programs.
If you have ever tried to make an initrd yourself, you might have come across this problem...
THE PROBLEM
1) The kernel boots
2) It finds the initrd file
3) Then this error here...
Kernel panic - not syncing: No init found. Try passing init= option to kernel.
And if you are like me, your init file is probably in the root directory as /init and it is probably a script linked to /bin/sh.
So I tried to copy over busybox and then make all the links, and I also copied all the needed libraries for busybox, which is just libc. Not matter what I tried I get "Kernel panic - not syncing: No init found. Try passing init= option to kernel." from the Linux kernel. This went on for like 8 hours of trying every single combination of things I could think of.
What does "Kernel panic - not syncing: No init found. Try passing init= option to kernel." mean?
A) It most normally means that the kernel can see your "init" script, but when it tries to load it in /bin/sh the sh program is throwing an exception, so the kernel error message can be misleading.
B) It can also mean that the initrd.gz file is corrupt(unlikely), or that the /init file is not there either, also unlikely. The error is most commonly generated from option A, so see solution 2 below for the proper fix to this annoying and misleading error message.
Solution 1 - Use Static Linking
I unzipped the initrd file from Puppy Linux 5.61 using cpio and gzip and I noted that the busybox inside the initrd.gz file is not the same as the busybox found once Puppy is booted. So I tried using this busybox inside the initrd instead and then it boots fine. The reason it works is because it is statically linked, it does not depend on any .so library files, but the real busybox when Puppy is running is linked to libc.so. But this solution is really bad because now you have two copies of busybox in your distribution, one in the initrd.gz file and another somewhere else that gets loaded at the switch_root! I mean two copies of busybox is just not acceptable!
Solution 2 - Put the ld.so libraries!
So I was hunting around on the internet and went through five hundred forums where every guy was making all kind of guesses as to what the problem is but to no avail! So finally I simply copy the ld.so(in Puppy is like ld.22.so and ld-linux.so.2, you need both the files and they are in /lib and are statically linked) files from /lib in Puppy 5.61 into the initrd, and it worked! In other words the kernel error message was caused because when it was trying to execute the /bin/sh program, the program tried to load libc.so, but in order to load libc.so it must also load ld.so first, which then actually loads libc.so on behalf of the program.
Notes
ldd is a program which tells you what libraries a program uses, but you need to be aware that any program which uses libraries also uses ld.so! Keep that in mind when making your initrd.gz file and you can forget about the init not found error message and get on with putting all your files from one distribution into your custom distribution.
Saturday 20 July 2013
Decreasing search popularity for Linux vs Windows
I was exploring some search terms on Google trends to see what is really happening in the world, because the news websites seem to be all advertisements. So I compared some common terms such as Windows, Java and C++ for example. As it turns out, Java is more than double everybody else in the programming department. Then I added Linux, which started out in 2005 with more searches than Java, but has since then till 2013 dropped off by a huge percentage and seems to be fading into obscurity, in direct contradiction to what you would think. But then I added in windows for comparison and the result was as expected, Windows is searched for more than all the other big keywords, and keywords like OsX an iOs will not even register on this graph.
If you look at the picture you will see the purple line on the top is Windows, showing how much interest there actually is in the operating system. The green line is Linux and you can clearly see that Linux as a word seems to be around a lot less, which is surprising.
 |
| Click to enlarge |
Friday 19 July 2013
Run bash style shell scripts using UnxUtils
In Linux, all the scripts have the following line at the top(known as a shebang)...
So when you run the script, the shell knows to use the program /bin/sh to execute the script.
But this will not work for UnxUtils since there is no /bin directory. You can make one, but then you would have to do that for every partition on your computer, and then put sh.exe in every folder!
The solution is to change the "shebang" so that it looks like this instead...
I find that this allows you to do things like executing the script from the Unix shell in Windows.
Alternatively you can also do this...
But that seems a little non-portable and not so wise.
Unfortunately, however you get it to run, the scripts then will not work in Linux. If you want your scripts to work in Linux then you must sadly create a bin directory with sh.exe or a bat file pointing to sh.exe in every partition on your hard disk. Then you can indeed use /bin/sh as the path of the shebang.
#!/bin/sh
So when you run the script, the shell knows to use the program /bin/sh to execute the script.
But this will not work for UnxUtils since there is no /bin directory. You can make one, but then you would have to do that for every partition on your computer, and then put sh.exe in every folder!
The solution is to change the "shebang" so that it looks like this instead...
#!sh
I find that this allows you to do things like executing the script from the Unix shell in Windows.
Alternatively you can also do this...
#!c:\UnxUtils\bin\sh.exe
But that seems a little non-portable and not so wise.
Unfortunately, however you get it to run, the scripts then will not work in Linux. If you want your scripts to work in Linux then you must sadly create a bin directory with sh.exe or a bat file pointing to sh.exe in every partition on your hard disk. Then you can indeed use /bin/sh as the path of the shebang.
Monday 15 July 2013
Processing Integers On 32 Bit vs 64 Bit Cpu
A number of questions that need to be answered when upgrading from 32 bit to 64 bit Cpu processing.
Q: Does a 64 bit integer on a 64 bit Cpu work slower than a 32 bit integer on a 32 bit Cpu?
A:
Not for most operators. Operators like add and subtract and shift seem
to be about the same. The exceptions are operators involving division. A
64 bit integer divide on a 64 bit Cpu is way slower than a 32 bit
divide on a 32 bit Cpu.
Q: Is processing a big
array of 64 bit integers on 64 bit Cpu slower than processing an array
of 32 bit integers on a 32 bit Cpu?
A: Yes. 64 bit
integers use more memory, so to get from one end of an array to the
other will read in more memory from the RAM, and if you are writing back
to the values then it will transfer more memory back to the RAM since a
64 bit integer is twice as large as a 32 bit integer. However
processing an array of 32 bit integers on a 64 bit Cpu transfers just
the same amount of memory as processing a 32 bit integer array on a 32
bit Cpu.
Q: Why did all the C++ compilers choose LLP64 and LP64 as the default model, which keeps int as 32 bits on 64 bit Cpu?
A:
Mostly to keep compatibility with existing code but also because it
requires less space in memory. Naive programs that just use int for
everything in the ILP64 model will have to deal with more bytes being
used up in the Cpu cache as a consequence of using 64 bit integers for
everything. In most existing programs almost everything to do with lists
and arrays and chunks of memory is in a context where the addressable
indexes into the memory can all be contained within 32 bits. You will
not find any 32 bit programs that use strings that are longer than 32
bits can store for example.Q: Which integer type should be used for list indexing in C++ on 64 bit Cpu?
A: For lists it is unlikely that you will ever need more than 2.4 billion items, at least with current systems, even 64 bit ones, so 32 bit is in 99.99% of cases ideal, since the extra 32 bits of a 64 bit are not needed. However progress is always going on so you might want to consider making a type called "ix_t" and using that instead for your list length fields and to index the lists. The problem is not just the indexing but if you had hundreds and thousands of objects in memory all of type "TList", then using a 64 bit integer would in all normal cases simply be unused 4 bytes on each list object.
Q: Which integer type should be used for array indexing on 64 bit Cpu?
A: This is a tricky question, since with array memory you can easily imagine people allocating large chunks of memory that cannot be indexed by a 32 bit int, for example, a 5Gb chunk of memory. However the practice of allocating very large chunks of memory is not yet common, and would be very rare in the overall usage of arrays in a program. Using a 64 bit integer for indexing does not make so much sense either. So if you are hyper optimizing some code, then for most arrays use a 32 bit integer and then a 64 bit integer only where you need it.
Otherwise the best thing to do is to benchmark your machine yourself. I have made a benchmark tool that builds in Codeblocks, and the download comes with a decent set of results for a Core 2 Duo Cpu.
Sunday 14 July 2013
Building Lazarus Ide With Free Pascal For FatDog64
This is a summary of how to build the Lazarus Ide on FatDog64. It will make a Pascal Ide that builds quickly, has a form designer, an integrated debugger and a great big class library full of components like buttons, image controls, menus, edits etc... Windows programmers will know a very similar thing called Delphi but this will put the 64 bit Free Pascal compiler and Ide on your FatDog64.
Note! This entire topic also applies to building Lazarus for Puppy Linux. Just requires a 32 bit build of Free Pascal that you can get from here.
1) Check if you have Free Pascal on your FatDog64. Type "fpc" in a terminal. If fpc is installed then you have fpc. Check the version. It should be at least 2.6.x I recommend 2.6.2. If you do not have Lazarus or your version is to old, then get this sfs file for Free Pascal 2.6.2 for FatDog64, or if you are in the future then read these instructions on how to make your own sfs of Free Pascal for FatDog64. Whatever you do, you must have a working fpc on your system.
2) Once you have a working fpc, then to put Lazarus on FatDog64 is just a matter of compiling it. Fortunately this is Pascal and not C++. Normally compiling large packages can take a long time but with Pascal it takes a minute or five depending on your Pc.
3) Download the Lazarus source code from http://sourceforge.net/projects/lazarus/?source=directory. I used version 1.0.10. Unzip it into a folder. When downloading code for Linux I recommend to always get the tar.gz or tar.bz2 file if there are different types of zip file.Just because some distributions of code like to format the line endings differently and will not tell you about that if the code is available as a zip and a tar.bz2 or a tar.gz.
4)With Lazarus you cannot build from the same source code to different binary targets, so you need a separate folder of the source code for each different type of Puppy Linux. So if you have five different Puppy Linux installed on one hard disk but they are all 32 bit then you only need one lazarus source code folder, but to build for FatDog64 and for normal 32 bit Puppy Linux you will need two different Lazarus folders.
In short the Lazarus source code folder is also the Lazarus build output folder, and therefore is also the Lazarus program folder etc...
5) Also it is a very good idea to put the Free Pascal source code in a directory next to your Lazarus directory. Do this before building Lazarus, so that once lazarus is built it will start and ask you where the Free Pascal source code is. Then you can just point to the directory of files and Lazarus will be happy. On my system I put the lazarus code into f:\lazarus64, I append 64 since that will be my lazarus build for FatDog64, and then I have one source code folder of the Free Pascal 2.6.2 code in F:\fpc-2.6.2 which is where lazarus can find files from, and then I reboot to Linux to do the actual compiling. If you want to build also a version for 32 bit Puppy Linux later then make another lazarus folder called lazarus32 and then both the builds in lazarus32 and lazarus64 can point to the same source code.
6) Now build the thing. Just go into the Lazarus code directory, open a terminal and type "make clean bigide". This will build it quickly compared to C++ packages and then just click the newly created file called "lazarus". The lazarus will start and it will ask you where the Free Pascal source directory is. You really do need to tell it so that Lazarus can work properly.
Versions
I specifically used the following files for this...
1) Free Pascal .sfs is made from fpc-2.6.2.x86_64-linux.tar, but you will not need this file because you can just download the Free Pascal sfs file, unless you want to build your own sfs file then read this topic.
Click here to download the sfs file and then install it on FatDog64. After that it is trivial to build the lazarus code.
3) lazarus-1.0.10-0.tar.gz - This file can be download from here. If you think that 1.0.10 is outdated by the time you read this then do try the newer version if you feel like it, but this was tested with 1.0.10 and it works great. Note how I specify the tar.gz file, this is important, because when downloading code for linux and they offer zip and also tar.gz formats it means that the zip is formatted with windows line endings and the tar.gz is formatted for linux line endings.
Note! This entire topic also applies to building Lazarus for Puppy Linux. Just requires a 32 bit build of Free Pascal that you can get from here.
 |
| FatDog64 running Lazarus in design mode! Click to enlarge. |
2) Once you have a working fpc, then to put Lazarus on FatDog64 is just a matter of compiling it. Fortunately this is Pascal and not C++. Normally compiling large packages can take a long time but with Pascal it takes a minute or five depending on your Pc.
3) Download the Lazarus source code from http://sourceforge.net/projects/lazarus/?source=directory. I used version 1.0.10. Unzip it into a folder. When downloading code for Linux I recommend to always get the tar.gz or tar.bz2 file if there are different types of zip file.Just because some distributions of code like to format the line endings differently and will not tell you about that if the code is available as a zip and a tar.bz2 or a tar.gz.
4)With Lazarus you cannot build from the same source code to different binary targets, so you need a separate folder of the source code for each different type of Puppy Linux. So if you have five different Puppy Linux installed on one hard disk but they are all 32 bit then you only need one lazarus source code folder, but to build for FatDog64 and for normal 32 bit Puppy Linux you will need two different Lazarus folders.
In short the Lazarus source code folder is also the Lazarus build output folder, and therefore is also the Lazarus program folder etc...
5) Also it is a very good idea to put the Free Pascal source code in a directory next to your Lazarus directory. Do this before building Lazarus, so that once lazarus is built it will start and ask you where the Free Pascal source code is. Then you can just point to the directory of files and Lazarus will be happy. On my system I put the lazarus code into f:\lazarus64, I append 64 since that will be my lazarus build for FatDog64, and then I have one source code folder of the Free Pascal 2.6.2 code in F:\fpc-2.6.2 which is where lazarus can find files from, and then I reboot to Linux to do the actual compiling. If you want to build also a version for 32 bit Puppy Linux later then make another lazarus folder called lazarus32 and then both the builds in lazarus32 and lazarus64 can point to the same source code.
6) Now build the thing. Just go into the Lazarus code directory, open a terminal and type "make clean bigide". This will build it quickly compared to C++ packages and then just click the newly created file called "lazarus". The lazarus will start and it will ask you where the Free Pascal source directory is. You really do need to tell it so that Lazarus can work properly.
Versions
I specifically used the following files for this...
1) Free Pascal .sfs is made from fpc-2.6.2.x86_64-linux.tar, but you will not need this file because you can just download the Free Pascal sfs file, unless you want to build your own sfs file then read this topic.
Click here to download the sfs file and then install it on FatDog64. After that it is trivial to build the lazarus code.
3) lazarus-1.0.10-0.tar.gz - This file can be download from here. If you think that 1.0.10 is outdated by the time you read this then do try the newer version if you feel like it, but this was tested with 1.0.10 and it works great. Note how I specify the tar.gz file, this is important, because when downloading code for linux and they offer zip and also tar.gz formats it means that the zip is formatted with windows line endings and the tar.gz is formatted for linux line endings.
 |
| FatDog64 running Lazarus in runtime mode. Click to enlarge. |
Saturday 13 July 2013
Building Codeblocks Ide On Puppy Linux and FatDog64
If you have tried to build Codeblocks on Puppy Linux and FatDog64, and not had much luck, then follow these steps to get it all working. I have tested these building steps on FatDog64 621 and on Precise Puppy Linux 561.
The bonus with this method of building the Codeblocks is that it will build a self contained folder that hosts it's own wxWidgets. Thus it can be executed from the same folder on many computers over the network, or just from multiple variations of Puppy Linux on one Pc. Either way, all the files go into one folder and then a simple Install script makes a link in /opt to the Codeblocks folder so you can just unzip and run.
If you just want the Ide pre-built, I also have those available from here, otherwise continue reading.
1) You need the devx sfs file for your Puppy Linux installed. This will put the make and C++ tools on your Puppy Linux. For me I have Precise Puppy 561 and FatDog64 621.
2) Download this file of scripts used to build the Codeblocks and the wxWidgets wxGTK at the same time. Read the instructions from step 3 before downloading the source. You need specific versions etc...
3) Unzip the scripts in some folder. In this folder is a readme.txt file and also a file called about.txt. Please read these for specific instructions.
4) Download the source code for wxGTK 2.8.12 and also Codeblocks 12.11, put them in folders as outlined in the instruction text files from step 3.
5)Be very, very sure you have got all the variables setup properly(about three or four values need to be set), and I mean be sure because unless you are running a fast Pc it will take an hour to build!
6) Execute your build script from a terminal. If you have followed the instructions good it should just work.
If you really cannot make it work, then leave a comment or maybe just download the pre-built folders I have made from here.
Otherwise here are some more details
The Build Script - You can either edit the scripts provided in scripts download ot make your own copy. As you can see the build is mostly controlled just by specifying names and some paths.
#!/bin/sh
# BUILD 32 BIT CODEBLOCKS WITH WX ONE TIME ON PUPPY LINUX
# Please edit these variables to suit your setup. Personally I just put everything in
# the root of my f:\ or /dev/sda7/ on linux, and then go from there. You might
# need to do it differently.
# wxBuildName - Name of the wxBuild - Not a path - Just a unique name for the build
wxBuildName="bld_wx2812_gtk_cb_puppy_561"
# wxPath - absolute path to the folder where wx source code is.
wxPath="/mnt/sda7/wx2812"
# wxOutputDir - Where to put wx build output
wxOutputDir="/mnt/sda7/cb_temp_work/$wxBuildName"
# cbBuildName - The name of the codeblocks build. Not a path, just a name for the codeblocks build.
cbBuildName="cb12_11_puppy_561"
# cbPath - absolute path to the codeblocks source code.
cbPath="/mnt/sda7/cb12_11"
# cbOutputDir - Where to put codeblocks build output, note this folder will be
# linked to from opt, which is where the build thinks it is putting
# the files, but actually they go here...
cbOutputDir="/mnt/sda7/cb_temp_work/$cbBuildName"
# Is it 64 bit, for FatDog64 will be 1, otherwise 0 for 32 bit
PuppyIs64Bit="0"
# Now execute the build using the include script
source `pwd`/xinc_util
The work script(xinc_util) - The worker script just takes the values from your build script and then actually does the build. The process is simply to build the wxWidgets, then set a bunch of variables so that Codeblocks build can see wxWidgets, then build Codeblocks and finally copy the wxWidgets into the output directory.
This script is called xinc_util. You do not execute it yourself but rather you make your own build script which sets the values and then calls this script.
Do not copy and paste this, just download it instead.
#!/bin/sh
# This script by Turboloops - turboloops@gmail.com
# No rights reserved, use at own risk!
if [ "$1" = "" ]; then
echo "This script must be included!"
exit 1
fi
THE_SCRIPT_DIR="`echo "${0}" | sed 's%/[^/][^/]*$%%'`/"
if [ "${THE_SCRIPT_DIR}" = "./" ]; then
THE_SCRIPT_DIR="`pwd`"
fi
echo "Working in directory $THE_SCRIPT_DIR"
# this script does all the work. You do not run this script itself. It is
# included by for example, make_cb_puppy561
# ------------------------------------------------------------
# Technically you should not need to edit any lines below this
# ------------------------------------------------------------
usage="Turboloops make_codeblocks script
Please specify the command properly...
--hello mandatory Safety against double click!
--compile-wx optional Do not re-configure the wx
--compile-cb optional Do not re-configure the codeblocks
Examples
Build codeblocks only
make_cb_xyz hello --compile-wx
Build wx only
make_cb_xyz --hello --compile-cb
Rebuild everything
make_cb_xyz --hello
"
if ! [ "$1" = "--hello" ]; then
echo "$usage"
exit
fi
shift
TheWxCmd="build"
TheCbCmd="build"
CleanCb=""
CleanWx=""
while [ "$1" ]; do
cmd="$1"
shift
if [ "$cmd" = "--compile-wx" ]; then
TheWxCmd="compile";
fi
if [ "$cmd" = "--compile-cb" ]; then
TheCbCmd="compile";
fi
if [ "$cmd" = "--clean-all" ]; then
CleanCb="1"; CleanWx="1";
fi
if [ "$cmd" = "--clean-cb" ]; then
CleanCb="1";
fi
if [ "$cmd" = "--clean-wx" ]; then
CleanWx="1";
fi
done
#echo "CleanCb=$CleanCb CleanWx=$CleanWx TheCbCmd=$TheCbCmd TheWxCmd=$TheWxCmd"
#exit
#if [ "$1" = "--compile-wx" ]; then
# TheWxCmd="compile"
# shift
#fi
#if [ "$1" = "--compile-cb" ]; then
# TheCbCmd="compile"
# shift
#fi
wxBuildDir="$wxPath/$wxBuildName"
# Make the directories for wx
mkdir -p $wxOutputDir
mkdir -p $wxBuildDir
cd $wxBuildDir
x64Flags=""
if [ "$PuppyIs64Bit" = "1" ]; then
x64Flags=CFLAGS="-fPIC" CXXFLAGS="-fPIC"
fi
echo "The x64Flags are $x64Flags"
echo "The WxCmd is $TheWxCmd"
echo "The CbCmd is $TheCbCmd"
#
# --enable-monolithic
if [ "$CleanWx" = "1" ]; then
make clean
fi
if [ "$TheWxCmd" = "build" ]; then
echo "Configuring wx in `pwd` ..."
../configure --prefix=$wxOutputDir --enable-unicode --enable-xrc --without-opengl $x64Flags
make clean
fi
make
make install
echo "Finished the wxWidgets compiling..."
# Put dir on path where is wx-config
savePATH=$PATH
export PATH=$wxOutputDir/bin:$PATH
# Add wxPrefixPath/lib to /etc/ld.so.conf(Here just cheat and put it in variable)
saveLD_LIBRARY_PATH=$LD_LIBRARY_PATH
export LD_LIBRARY_PATH=$LD_LIBRARY_PATH:$wxOutputDir/lib
# run ldconfig
#ldconfig
#source /etc/profile
export ACLOCAL_FLAGS="-I $wxOutputDir/share/aclocal"
mkdir -p $cbOutputDir
# Make a symlink to the output directory in opt
thePwd=`pwd`
cd /opt
rm $cbBuildName
ln -svf $cbOutputDir $cbBuildName
# Rename the output directory, now the compiler will put files in opt but
# actually is going to the proper place outside of Puppy Save files!
cbOutputDir=/opt/$cbBuildName
cd $cbOutputDir
echo > Install "# Install the codeblocks to opt/$cbBuildName !"
echo >> Install "THE_SCRIPT_DIR=\"\`echo \"\${0}\" | sed 's%/[^/][^/]*$%%'\`/\""
echo >> Install "if [ \"\${THE_SCRIPT_DIR}\" = \"./\" ]; then"
echo >> Install " THE_SCRIPT_DIR=\"\`pwd\`\""
echo >> Install "fi"
echo >> Install "cd /opt"
echo >> Install "rm $cbBuildName"
echo >> Install "ln -svf \$THE_SCRIPT_DIR $cbBuildName"
echo >> Install "echo \"You can now use Codeblocks!\""
echo > Readme.txt "Codeblocks built for Puppy Linux by Turboloops - turboloops@gmail.com"
echo >> Readme.txt "--------------------------------------------------------"
echo >> Readme.txt "Each time you move this folder, just double click the script Install"
echo >> Readme.txt "and it will install it for you..."
echo >> Readme.txt "This build is not like Windows! It will look for libraries in"
echo >> Readme.txt "/opt/$cbBuildName and therefore you need to create the"
echo >> Readme.txt "symlink to this directory in /opt so that it works properly."
echo >> Readme.txt "If the Install script does not work then create the symlink yourself"
echo >> Readme.txt "but make sure the name of the symlink is $cbBuildName"
# Now return to where it was
cd $thePwd
MyPlugins=""
MyPlugins="--with-contrib-plugins=all,-NassiShneiderman,-SpellChecker,-FileManager"
# Here are the plugin names - Specify -TheName after the all to not do one and just comment out
# the entire line to not build any!
#Plugin names are: AutoVersioning, BrowseTracker,byogames,Cccc,CppCheck,cbkoders,codesnippets,
# codestat, copystrings, Cscope, DoxyBlocks, dragscroll, EditorConfig, EditorTweaks, envvars,
# FileManager, headerfixup, help, hexeditor, incsearch, keybinder, libfinder, MouseSap,
# NassiShneiderman, profiler, regex, ReopenEditor, exporter, symtab, ThreadSearch,
# ToolsPlus, Valgrind, wxsmith, wxsmithcontrib,wxsmithaui
#
#
#
# The plugins that are excluded here require libs, if you hve them then just change the line
#MyPlugins="--with-contrib-plugins=all,-NassiShneiderman,-SpellChecker,-FileManager,-byogames,-BrowseTracker,-EditorConfig,-EditorTweaks,-MouseSap"
if [ "$PuppyIs64Bit" = "1" ]; then
MyPlugins="--with-contrib-plugins=Valgrind,wxsmith,wxsmithcontrib,wxsmithaui,symtab,envvars"
MyPlugins="$MyPlugins,ThreadSearch,profiler,regex,help,hexeditor,Cccc,CppCheck"
MyPlugins="$MyPlugins,codesnippets,codestat,copystrings,Cscope,DoxyBlocks,EditorConfig,EditorTweaks"
#MyPlugins="$MyPlugins,libfinder,ToolsPlus"
#MyPlugins="$MyPlugins,ToolsPlus,keybinder,help,headerfixup,"
#MyPlugins="$MyPlugins,ToolsPlus"
#MyPlugins="$MyPlugins,exporter"
fi
# Build the codeblocks now
cd $cbPath
if [ "$CleanCb" = "1" ]; then
make clean
fi
if [ "$TheCbCmd" = "build" ]; then
echo "Configuring cb..."
./bootstrap
./configure --with-wx-config=$wxOutputDir/bin/wx-config --prefix=$cbOutputDir $MyPlugins
make clean
fi
#exit
make
make install
# And now copy the wxWidgets dll files into your codeblocks folder, this
# is so the codeblocks can just run anywhere without needing wxwidgets to
# be installed.
cp $wxOutputDir/lib/lib* $cbOutputDir/lib
# Finally set the variables back and run ldconfig again, I am not sure
# if this is needed but it should keep the system clean? I mean I built
# a wrong version of wx before and then the link was always going to that
# version so maybe this will prevent that from happening.
#export PATH=$savePATH
#export LD_LIBRARY_PATH=$saveLD_LIBRARY_PATH
#ldconfig
#source /etc/profile
Thursday 11 July 2013
menu.lst examples for FatDog64 64 bit linux
If you are used to using Puppy Linux then you might know the menu.lst commands, but now with FatDog64 the syntax has changed a bit so you need to adapt your menu.lst entries if you want to boot up FatDog64 from a folder on your hard disk, which is the best way to do it since it requires no Cd burning and also it does not use up or "own" an entire disk partition. You can put unlimited installations of various Puppy Linux distributions on the same hard disk partition and dual boot to any one of them!
These lines are instructions to the boot loader for which linux to boot and which initrd to load. Since the files are on the hard disk the numbers have to be specified and the boot loader will not just detect them.
See this topic for more information about the boot parameters to FatDog64.
# Example menu.lst entries for FatDog64 621
# Explanation of the device numbers
# (hd0,0) - First partition on first hard drive
# (hd0,1) - Second partition on first hard drive
# ...
# (hd0,4) - Fifth partition on first hard drive
# etc...
# sda1 = First parition
# sda2 = Second parition
# sda5 = Fifth parition
#
# So on my machine...
# F:\ is /dev/sda5 aka (hd0,4)
# C:\ is /dev/sda1 aka (hd0,0)
# D:\ is /dev/sda2 aka (hd0,1)
# LOAD FATDOG64 IN RAM. WILL NOT LOAD A SAVEFILE.
title FatDog64 - 621 - F: - sda5 - RAM
rootnoverify (hd0,4)
kernel /fd64_621/vmlinuz savefile=none
initrd /fd64_621/initrd
# Load FatDog64 - Look for savefiles in all disk drives in the root and one folder deep
# In other words it will scan all the partitions, and every root level folder for
# potential save files. This is Ok, but you should rather use following entries
# that gets options which actually specify the name of the savefile which saves
# a few seconds at boot time.
# If you specify search=1 then it will only look for save files in the root
# of each drive partition, and not go into any folders.
# If it finds two savefiles it will ask so remember to save the save files with a
# decent name if you use multiple save files, otherwise it is difficult to know which
# one to load.
title FatDog64 - 621 - F: - sda5 - Automatic savefile
rootnoverify (hd0,4)
kernel /fd64_621/vmlinuz search=2
initrd /fd64_621/initrd
# Load FatDog64 - Use custom savefile in a folder
# If you like, you can specify the path to the savefile when you create it, so
# now I installed FatDog files into f:\fd64_621 by unzipping the downloaded
# .iso file using 7zip. Since I have installed to f:\fd64_621 which
# on my machine is /dev/sda5 I can save my savefile in the same folder and
# then just move the folder around when I need to upgrade. On the new machine all
# I have to do is then edit the grub entries and everything is all together. Technically
# my whole Os is just in one folder that I can copy and paste to any machine I like
title FatDog64 - 621 - F: - sda5 - Custom Savefile
rootnoverify (hd0,4)
kernel /fd64_621/vmlinuz savefile=direct:device:sda5:fd64_621/fd64save.ext4
initrd /fd64_621/initrd
# Load FatDog64 - Use the default save file(The location of which you chose when you created it)
# If you put the FatDog files into (hd0,4) and then saved your savefile into /dev/sda5 with
# the default filename you can use this option
title FatDog64 - 621 - F: - sda5 - Default Savefile
rootnoverify (hd0,4)
kernel /fd64_621/vmlinuz savefile=direct:device:sda5:/fd64save.ext4
initrd /fd64_621/initrd
Installing Gcc On FatDog64 621
I needed to use Gcc to benchmark 64 bit instructions on Linux for my 64 bit machine. So I installed FatDog64 but by default it does not have gcc(which would be nice), but they leave it out to keep the installation small.
So you have to download a separate .sfs file and then use that to hoist pre-built gcc and other build tool such as Python into FatDog64.
The sfs file that contains gcc for Puppy Linux (which FatDog64 is a derivative of), is known as the devx file. The specific file you need for FatDog64 621 is http://distro.ibiblio.org/fatdog/sfs/600/fd64-devx_620.sfs, but you might have a newer or older version of FatDog64 so see here if there is one for your version, otherwise pick the closest match.
Once you have the devx sfs file, you need to put it on your hard drive and then tell FatDog64 to load it into the filesystem at startup, so that the gcc tools will all then be on the path and you can build files like normal.
1) In FatDog64 start menu, go to the Control Panel option.
2) The control panel will appear.
3) Click the system tab.
4) Double click the System Sfs Loader
5) Select the "devx sfs" file that you downloaded. Now this might be a bit tricky as by default it might not appear in the listing, so navigate to the root directory of where you installed FatDog64 and then put all your sfs files into that folder. Next time FatDog64 starts it will then know the correct place.
6) Be sure to tick the checkbox that specifies to load at next startup.
7) Then click the load button.
This image shows the System SFS loader, with some .sfs files in the right panel. Sfs files in the left panel are available and the ones on the right are the loaded .sfs files. What these actually are is compressed file systems(SFS = squash file system), and the contents of the file systems are mapped into the unix file system so that it seems like the programs are there, in this case Gcc, but if you look in this picture I also have the 32 bit compatibility layer and the Wine installed via .sfs files.

Now you will have gcc and make installed on your system and can then start doing things like building c++ programs or adding in an IDE like Codeblocks for example. See this topic for information on getting Codeblocks running or download a pre-built Codeblocks folder for FatDog64.
So you have to download a separate .sfs file and then use that to hoist pre-built gcc and other build tool such as Python into FatDog64.
The sfs file that contains gcc for Puppy Linux (which FatDog64 is a derivative of), is known as the devx file. The specific file you need for FatDog64 621 is http://distro.ibiblio.org/fatdog/sfs/600/fd64-devx_620.sfs, but you might have a newer or older version of FatDog64 so see here if there is one for your version, otherwise pick the closest match.
Once you have the devx sfs file, you need to put it on your hard drive and then tell FatDog64 to load it into the filesystem at startup, so that the gcc tools will all then be on the path and you can build files like normal.
1) In FatDog64 start menu, go to the Control Panel option.
2) The control panel will appear.
3) Click the system tab.
4) Double click the System Sfs Loader
5) Select the "devx sfs" file that you downloaded. Now this might be a bit tricky as by default it might not appear in the listing, so navigate to the root directory of where you installed FatDog64 and then put all your sfs files into that folder. Next time FatDog64 starts it will then know the correct place.
6) Be sure to tick the checkbox that specifies to load at next startup.
7) Then click the load button.
This image shows the System SFS loader, with some .sfs files in the right panel. Sfs files in the left panel are available and the ones on the right are the loaded .sfs files. What these actually are is compressed file systems(SFS = squash file system), and the contents of the file systems are mapped into the unix file system so that it seems like the programs are there, in this case Gcc, but if you look in this picture I also have the 32 bit compatibility layer and the Wine installed via .sfs files.

Click image to enlarge
Now you will have gcc and make installed on your system and can then start doing things like building c++ programs or adding in an IDE like Codeblocks for example. See this topic for information on getting Codeblocks running or download a pre-built Codeblocks folder for FatDog64.
 |
| This image shows FatDog64 running gcc in a console, and also loaded via means of sfs is Wine running a Windows application. |
Installing Wine On FatDog64 621
Wine is a program that you can install into FatDog64 that will allow you to run Windows programs, for example Macaw or Macwaves.
Before you begin, make sure you have installed FatDog64 Linux and also that your savefile is created. Loading sfs files is easiest when you have already created your savefile. The savefile is a file on the disk that FatDog64 uses to store all the local settings(such as mapped sfs files for example) .
Installing Wine in FatDog64 is very simple. You need to follow these steps.
1) Download the Wine sfs file for FatDog64 from here(about 30Mb) (Click here to view all the sfs files available)
2) If you do not have it already then you also need to 32 bit compatibility layer so that Wine will execute it. Get the compatibility layer from here(30Mb).
2) Place the sfs file in the root of the drive where you have the FatDog64 folder. In my case that is f:\fatdog64_621 from a windows view, and /dev/sda5/fatdog64_621 from linux.
3) If you are in Windows, then reboot and boot into FatDog64.
4) Tell FatDog64 to load the sfs file when it boots up, then reboot FatDog64. Do this by opening the FatDog64 System Sfs Loader, which is in Start Menu/Control Panel/System/System Sfs Loader. If you downloaded the 32 bit compatibility layer then you must add that into the Sfs loading as well so that Wine will execute properly.
If by default your System Sfs Loader wants to load files from root home but that points nowhere then you might need to mount your hard disk and browse to the place where you put the sfs files. I put them in the root of the partition where I installed the fatdog64 files, in my case F:\ but on Linux it is known as /dev/sda5 on my machine.
 |
| FatDog64 Linux with the control panel and the System Sfs loader panels opened. Click the image to enlarge. |
 |
| FatDog64 Linux running a Windows application called Macaw in Wine. Also there is a console open running Gcc but that is not in Wine, but does show also that Gcc can be loaded into FatDog using sfs files. |
Installing FatDog64 for Dual Boot From Windows Xp

I am trying FatDog64 so that I can use 64 bit instructions on a 64 bit computer. I have Windows Xp 32 bit but I want to benchmark some 64 bit instructions so FatDog64 seems the logical choice since it is about the smallest decent Linux that is 64 bit and that can be downloaded quickly. Around 224 megabytes for the download. Other linux are about 600Mb to 3Gb of download which is just not going to happen.
You can get FatDog64 from here.
I am going to install FatDog64 simply by unzipping the ISO file and putting the contents into a directory on my hard disk. I am doing this using 7zip on windows. Then I will add a boot entry so that I can dual boot into Windows Xp or into FatDog64. Actually I can already dual boot into another Puppy Linux called Precise Puppy.
Important! FatDog64 includes options for installing to disk in much the same way as this article describes, so if you want to burn a Cd and then install from the Cd to the hard drive then that is an option. The downside is you have to burn a Cd, the upside is it puts it on the disk for you. The method described in this page requires no Cd to be burnt, you can just unzip the iso and boot from the unzipped contents using GRLDR...
See here for information on how to setup the boot loader to make it possible. - This involves adding one line to the Windows Xp boot.ini file, and then editing a file called menu.lst. Fairly simple if you follow the instructions properly.
Doing it like this means you do not have to burn to a Cd and you can install as many different Puppy Linux distributions on the same computer. So after this I will have a 64 bit Puppy Linux, 32 bit Precise Puppy and also Windows Xp. More than enough to work with!
So at this point I have the contents of the iso file extracted to f:\fd64_621 on my Windows Xp machine, which is about to be dual bootable to FatDog64 linux as well. The problem now is how to dual boot to FatDog64. Fortunately from Windows Xp this is very simple.
1) Put GRLDR - Needed to boot up FatDog64
Click here to download GRLDR, a small binary file that you must copy into the root drive where Windows Xp is installed.
2) Edit menu.lst - tells GRLDR HOW to boot the FatDog64
Click here to download a sample menu.lst file used for booting FatDog64
Read this topic for information about how to edit the menu.lst file to add entries for booting to FatDog64
The example menu.lst file is for the F:\fd64_621 folder on my computer so if you put it on c:\otherfolder thenpay close attention to the device numbers in your menu.lst entries.
3) Edit boot.ini
In your Windows Xp drive, like c:\ for example there is a file called boot.ini. Double click it and it will open in Notepad. Add the following line.
C:\GRLDR="Start GRUB"
4) Reboot the machine
Reboot now and you will see the "Start Grub" has been added to your bootup options. Choose "Start Grub"
5) Select an option that appears
If you edited your menu.lst file correctly then it will boot and it will boot fast. FatDog64 is in it's own world when it comes to boot speed. It literally just starts. No questions, no delay. Takes about ten seconds.
6) Create the savefile
The first thing you want to do once FatDog64 has started is to create the savefile. Do this just by opening the start menu and clicking reboot. It will ask some questions and then it will create a save file. I do not need so much space so I chose a size of 192Mb. Also I chose the ext3 file system because it sounded best and also I save my files into the directory fd64_621 but you can just use the default filename etc...
7) Wait for reboot
After rebooting it will load again. Now is up to you which option from the menu.lst file to use. The first one in the examples says to use all Ram, this means no savefile, so if you get stuck use this option. Otherwise pick the automatic option and it will locate the savefile for you. When you are ready though try and edit the menu.lst file so that it knows exactly which file to load, which will save a few seconds of time at boot up.
On my machine, since I added all my sfs files into /dev/sda5 aka F:\ it automatically asked me which sfs files to load on the second boot. This was kind of convenient but you can also just configure the sfs at any time from the control panel.
Results
So I rebooted the machine and it loads and boots first time. My initial thoughts are that it boots up the first time about 5 times faster than the Precise Puppy, asks about no questions and then runs very well. On the flip side, the part when you shut down that asks where to save the storage file wants to put the storage file into a partition and does not automatically put it in the folder where I unzipped the puppy files, but maybe that is just because I am used to the way it works in Puppy 5.6.1 32 bit, but you can of course specify that it does like old Puppy did just by adding the folder name plus a forward slash before the filename.
 | ||
| This is what FatDog64 looked like on my second boot after creating the save file. Note that if you want it to do this for you then you must put your sfs files into the root of the drive where you put the FatDog64 folder. |
| ||
| And this shows FatDog64 running gcc 64 bit and also Macaw(a windows 32 bit music program ) in Wine. I enabled Wine and gcc by using the Systems Sfs loader applet in the System panel of the control panel, which you can open from the start menu. |
Overall it looks like FatDog64 is going to become my go to desktop for anything to do with Linux and 64 bit stuff.
- It loads fast
- I can dual boot from Windows Xp
- It requires no Cd burning
- It requires no separate partition
- I can put different versions of FatDog64 alongside different versions of Puppy Linux in the same disk partition
- It does not modify the MBR
- It is 64 bit!
- It can still run 32 bit programs via the 32 bit compatibility layer
Sunday 7 July 2013
Install Puppy Linux On Your Windows Computer
Rationale To Use Puppy Linux - Puppy Linux is tiny and fast. A 170MB download plus another 100MB to add GCC. Other distributions are much bigger. Boots from folder on same drive as windows, or from folder on any drive. Multiple installs on same partition. Multiple "states" per install. Easy to add, easy to remove. Boots fast.
1) Download Precise Puppy 5.6.1
I recommend 5.6.1 because it is most compatible with Debian, which is most compatible with some other Linux distrbutions. You can get the files from http://distro.ibiblio.org/quirky/precise-5.6.1/ . You need the precise-5.6.1.iso file and if you want to do programming with gcc then get the devx...sfs file as well.
2) Download and install 7zip
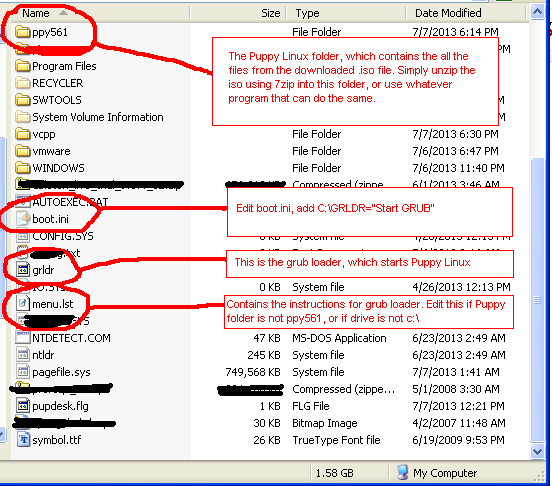
If you already have 7zip then just unzip the iso somewhere.You need 7zip to unzip the .iso file. Yes, that is how this works. The iso gets unzipped and then we direct the Windows boot manager to boot directly from the files. You need to unzip the iso in a folder that is one level deep off of the disk drive, for example, c:\ppy561 or d:\puppy561. I used ppy561 as the folder name. A folder name like d:\myfiles\ppy561 is not good because it is two levels deep. It must just be one level off the root of the disk drive.
I seriously recommend using c:\ppy561 because then you can complete the following two steps with minimal effort. Otherwise you will need to manually edit the menu.lst file(see step 4), but that is not so hard if you really want to put it on d:\ or e:\ for example.
3) Download GRLDR(Grub Loader) and configure the boot entry for it - Click here to download
GRLDR is a tiny file that we will put into the c:\ or the drive where Windows is installed. You need this file so that the Windows Boot Manager can transfer the booting to GLDR, which will then boot Puppy Linux from the folder where you have placed the files.
If you are using windows Xp, then add the following line to your boot.ini file, which is located in the root of the Windows drive, for example c:\boot.ini
Add this line to boot.ini for Windows Xp
C:\GRLDR="Start GRUB"
Note that I have note tested these versions of Windows below. I only did this with Windows Xp, which is a much better system for me because it is faster and I don't see how applications that use four times the memory are better.
For other versions of Windows you will need to use more complicated means and tell it to start the GRLDR file for you. Try these links for more info.
http://diddy.boot-land.net/grub4dos/files/install_windows.htm
See this topic at Microsoft for more information.
http://www.sysprobs.com/free-gui-boot-loader-editor-windows-7-forget-command-tool
If all of that seems to much, also try EasyBcd, which is a tool you can use to edit the boot in Windows 7 and 8 and Vista from a GUI.
Any way it goes down you need to simply get some form of grub into memory and direct it to boot the initrd and kernel from the unzipped iso. Thats all.
4) Download menu.lst - Click here to download
The menu.lst file is used by the Grub loader to know which folder to boot Puppy Linux from.
If you placed the unzipped iso files inside c:\ppy561, then just put this menu.lst file in the windows drive along with your GRLDR. Otherwise if you really needed a different folder like d:\ppy561, or c:\puppyx then you must manually edit the menu.lst file. Instructions for editing the file are in comments, and it involves assigning the correct drive numbers to about 5 lines of commands to the grub loader. Much easier than it sounds, and it cannot break your computer, but basically just involves editing the file and then rebooting until it works in the case you have to guess the numbers. You can edit the file in windows using Notepad or Wordpad and then just reboot.
After doing all the steps above you should end up with something like this...
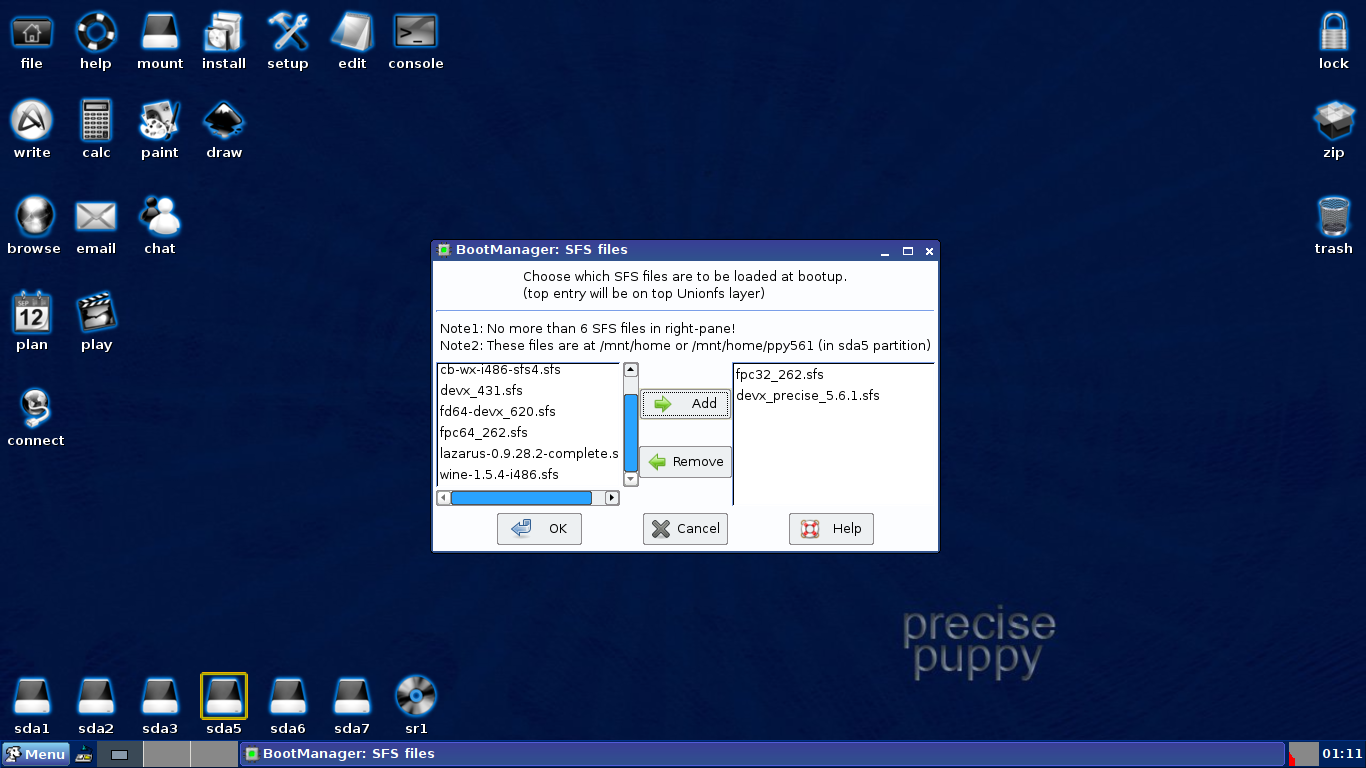
5) Put SFS files
If you downloaded the devx sfs file(a Puppy package that has gcc) then put it in the root of the drive where your Puppy folder is. If you put Puppy in c:\ppy561 then put the sfs files in c:\ for example. Note that once Puppy is running you must run the Boot Startup Configuration program from the start menu to tell Puppy to load the sfs files you want.
6) Finished
So now you should have a working Linux and dual boot. From here you can boot into Linux and then do things like build code and learn abut Linux. See this link for how to put a C++ IDE called Codeblocks into the Puppy Installation with minimal effort.
Install Codeblocks On Puppy Linux
Note this article is superseded by a newer build of Codeblocks 12.11 from here.
I needed to use Codeblocks on Puppy Linux, but it is a big job to build it and the rpm files from Codeblocks do not work so I found a much easier solution.
First I installed Precise Puppy 5.6.1 on my computer. I installed it so that I can just boot to either Windows Xp or to Puppy Linux. If you need to install Puppy Linux on your Windows computer so that you can dual boot to Windows or Linux then please click here. Installing the Puppy Linux is not like other Linux installs, you can just put the files in a folder and then boot from the folder. In other words you can have three different versions of Puppy Linux on the same drive and partition as your Windows installation!
Installing the Codeblocks is simple using this method, which places an sfs file that Puppy loads into the Uniz filesystem automatically for you...
1) Download the sfs file. An sfs file is a special file that Puppy uses to manage packages.
(Note that this version of Codeblocks works well on Puppy Linux 5.6.1 but on previous versions of Puppy Linux, such as 4.3, the step debugging does not work, so I recommend using Puppy Linux 5.6.1)
2) Place the file in the root of the drive where your Puppy Linux folder is. So if Puppy linux is in d:\ppy561 then put the sfs file in the d:\
3) Boot to Puppy Linux and then go to the menu, and locate the "Boot Manager" entry. Browse to the sfs file and the select it for loading at boot time.
4) Reboot the Puppy Linux and then Codeblocks will be installed.
Saturday 6 July 2013
Suse Studio - Build and test your own Linux online
One problem with downloading Linux to use for testing and building C++ is that all the Linux servers deliver distrubutions that are made for users, packed with lots of programs but no decent IDE or GCC, and certainly not properly configured.
So I found this online Linux distribution building tool at http://susestudio.com which allows you to build and then run your own Linux, either 32 bit or 64 bit, with KDE, Gnome, XFCE or other window managers, and it allows you to build to a disk image, Live CD, and various virtual machine images.
All you have to do is register free at http://susestudio.com and you can start building right away, with all the files and options stored online, it's all done through the browser.
But please note, this is just a fallback solution for those looking for a very specific flavor of Linux and not something I would recommend if you just want to watch movies, listen to music or check the email, for that try Puppy Linux or FatDog64 if you have a 64 bit ready computer.
Subscribe to:
Posts (Atom)