Rationale To Use Puppy Linux - Puppy Linux is tiny and fast. A 170MB download plus another 100MB to add GCC. Other distributions are much bigger. Boots from folder on same drive as windows, or from folder on any drive. Multiple installs on same partition. Multiple "states" per install. Easy to add, easy to remove. Boots fast.
1) Download Precise Puppy 5.6.1
I recommend 5.6.1 because it is most compatible with Debian, which is most compatible with some other Linux distrbutions. You can get the files from http://distro.ibiblio.org/quirky/precise-5.6.1/ . You need the precise-5.6.1.iso file and if you want to do programming with gcc then get the devx...sfs file as well.
2) Download and install 7zip
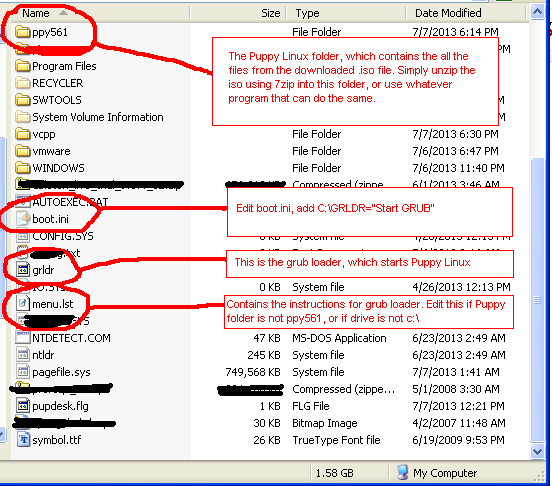
If you already have 7zip then just unzip the iso somewhere.You need 7zip to unzip the .iso file. Yes, that is how this works. The iso gets unzipped and then we direct the Windows boot manager to boot directly from the files. You need to unzip the iso in a folder that is one level deep off of the disk drive, for example, c:\ppy561 or d:\puppy561. I used ppy561 as the folder name. A folder name like d:\myfiles\ppy561 is not good because it is two levels deep. It must just be one level off the root of the disk drive.
I seriously recommend using c:\ppy561 because then you can complete the following two steps with minimal effort. Otherwise you will need to manually edit the menu.lst file(see step 4), but that is not so hard if you really want to put it on d:\ or e:\ for example.
3) Download GRLDR(Grub Loader) and configure the boot entry for it - Click here to download
GRLDR is a tiny file that we will put into the c:\ or the drive where Windows is installed. You need this file so that the Windows Boot Manager can transfer the booting to GLDR, which will then boot Puppy Linux from the folder where you have placed the files.
If you are using windows Xp, then add the following line to your boot.ini file, which is located in the root of the Windows drive, for example c:\boot.ini
Add this line to boot.ini for Windows Xp
C:\GRLDR="Start GRUB"
Note that I have note tested these versions of Windows below. I only did this with Windows Xp, which is a much better system for me because it is faster and I don't see how applications that use four times the memory are better.
For other versions of Windows you will need to use more complicated means and tell it to start the GRLDR file for you. Try these links for more info.
http://diddy.boot-land.net/grub4dos/files/install_windows.htm
See this topic at Microsoft for more information.
http://www.sysprobs.com/free-gui-boot-loader-editor-windows-7-forget-command-tool
If all of that seems to much, also try EasyBcd, which is a tool you can use to edit the boot in Windows 7 and 8 and Vista from a GUI.
Any way it goes down you need to simply get some form of grub into memory and direct it to boot the initrd and kernel from the unzipped iso. Thats all.
4) Download menu.lst - Click here to download
The menu.lst file is used by the Grub loader to know which folder to boot Puppy Linux from.
If you placed the unzipped iso files inside c:\ppy561, then just put this menu.lst file in the windows drive along with your GRLDR. Otherwise if you really needed a different folder like d:\ppy561, or c:\puppyx then you must manually edit the menu.lst file. Instructions for editing the file are in comments, and it involves assigning the correct drive numbers to about 5 lines of commands to the grub loader. Much easier than it sounds, and it cannot break your computer, but basically just involves editing the file and then rebooting until it works in the case you have to guess the numbers. You can edit the file in windows using Notepad or Wordpad and then just reboot.
After doing all the steps above you should end up with something like this...
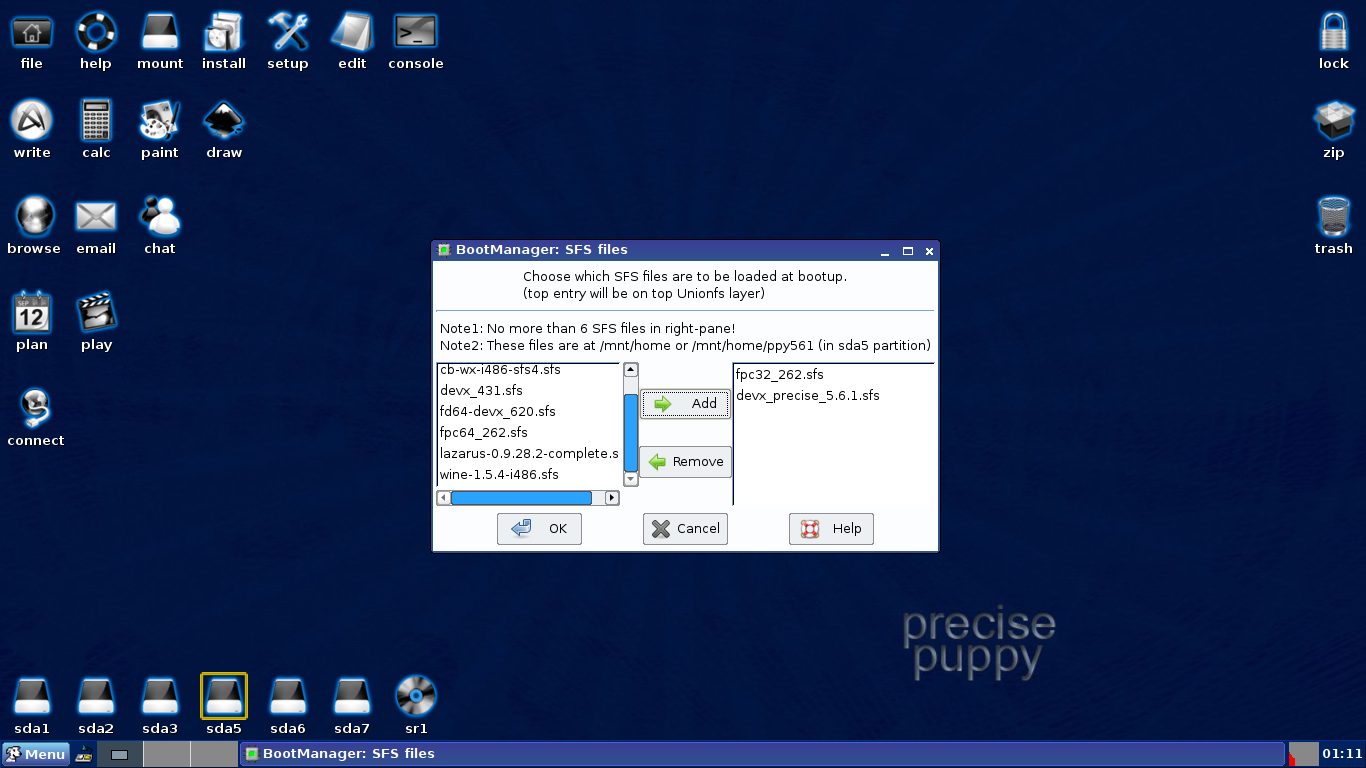
5) Put SFS files
If you downloaded the devx sfs file(a Puppy package that has gcc) then put it in the root of the drive where your Puppy folder is. If you put Puppy in c:\ppy561 then put the sfs files in c:\ for example. Note that once Puppy is running you must run the Boot Startup Configuration program from the start menu to tell Puppy to load the sfs files you want.
6) Finished
So now you should have a working Linux and dual boot. From here you can boot into Linux and then do things like build code and learn abut Linux. See this link for how to put a C++ IDE called Codeblocks into the Puppy Installation with minimal effort.
No comments:
Post a Comment